
How To Use Resin Molds
Do you want to start creating exciting resin projects in the comfort of your own home but not sure where and how to begin? Resin molds provide an inexpensive way to make art, decorations, jewelry, and more.
But if it's your first time using them, you may feel overwhelmed. This blog post is a comprehensive guide for beginners on how to use resin molds safely and correctly so that you can take advantage of its full potential.
So get ready to dive into the wonderful world of resin craft!
What You'll Need to Get Started
To get started on your resin mold project, you'll need the right materials and tools. Start by gathering essential supplies such as:
- Silicone molds of various sizes and shapes
- Resin mix
- Cups for measuring out additives
- Mold release spray
- Stir sticks for stirring the mix
- Gloves to protect your hands from sticky residue
Other optional items you may want to invest in are pressure pots or vacuum chambers. They help to remove air bubbles from finished parts during the curing process. In addition to that some safety gear is a must have such as protective eyewear and ventilation masks when using strong chemical smells associated with casting resins.
How To Use Resin Molds: A Comprehensive DIY Guide For Beginners
From preparing the molds to adding inclusions, this guide will help you learn the techniques of using resin molds for a successful DIY project. Read on to get started!
Preparing the molds
Whether using silicone or cornstarch and silicone molds, preparing your resin molds correctly is essential for a successful casting. If the mold isn’t prepared properly, it could affect the outcome of the project.
- Make sure to clean and dry your mold before beginning the process. This helps ensure that there are no dust particles in your castings once they have cured.
- Remove any residue from previously used molds. It can cause discoloration or other issues to occur when trying to create a new product with these materials.
- Apply mold release spray before pouring epoxy resin into each type of material like silicone, wax paper or plastic cups/dishes. This allows for an easier removal of encapsulated items from their respective molds. It reduces the risk of damaging them during demolding time!
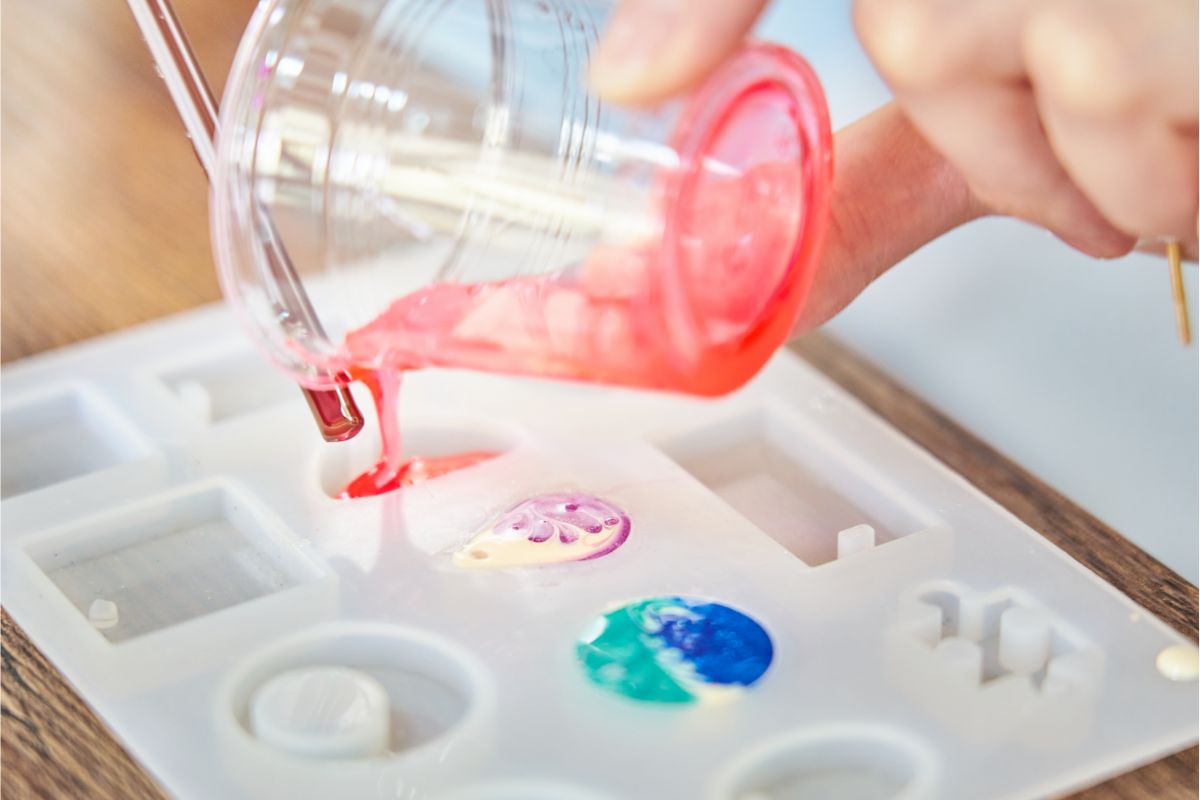
Mixing and pouring the resin
Mixing up the resin can be intimidating for beginners, but with practice and patience, it becomes a cinch. To get started on this crafty endeavor, you'll need to gather all your materials. We recommend you to get an epoxy resin crystal clear kit. It comes with a measuring cup and other tools you will need as well as mixing sticks to combine the parts of the resin correctly.
Measure out equal parts of each part in separate containers exactly according to manufacturers' instructions. An improper ratio can leave your project prone to cracks or not setting at all. Once everything is mixed properly, pour into molds slowly – make sure it covers everything that needs covered.
Dab any remaining bubbles from the top using either a straw or heat gun (best practiced in small areas). Make sure resins have cured completely before attempting demolding and cleaning off any excess residue! If done correctly, now you're set with some great personalized pieces made by your own hands!
Removing bubbles
One of the most important steps when working with a resin mold is removing any air bubbles. There are several methods that can be used and each have their own benefits, depending on the size and shape of your project.
- Alcohol spray: The alcohol helps to break the surface tension of the resin and eliminates small bubbles while it is still liquid.
- Bubble fishing method: This involves tapping or pressing gently on various spots of the resin as it sets. This helps to release any trapped air bubbles. Folding or bending should be avoided during this process as this could result in damage to your piece.
- Tapping: Lightly tapping one side of the mold after pouring can help move trapped air towards one edge. This makes them easier to remove by other methods such as bubble fishing mentioned above.
Demolding and cleaning
It is important to demold and clean your resin molds after use in order to ensure the longevity of the molds. Here are some steps for successful demolding and cleaning which can help you get the most from your resin molds:
- Before demolding, gently push on the edges of the mold until it starts to release, then carefully remove it from the surface.
- Mix warm water and mild soap in a container. Soak a soft sponge or cloth into this solution and start cleaning all surfaces thoroughly with gentle circular motions.
- Rinse off with cold water using a garden hose or bucket of water, allowing a few minutes for complete removal of residues like detergent bubbles. You should ensure that all areas are rinsed cleanly before drying it out completely indoors under low fan speed (ventilation).
- To maximize the lifetime performance of your resin molds, spray both sides with mold release spray before storing them away until next time they’re needed for another creative project!
Tips for Beginners
To ensure successful resin molding for beginners, it is important to use mold release spray before pouring the resin. You should also let the resin cure completely and practice safety measures at all times.
Use mold release spray
When using resin molds, it is essential to apply a mold release spray before pouring the resin. This anti stick layer prevents sticking and enables easy removal of the finished product from the molds.
Mold release sprays come in various forms such as lubricant, wax, oil, compound or aerosol solution. They are widely available through online craft stores or art supplies shops. Applying a mold release spray can also prolong the lifespan of your resin molds as it prevents excessive wear and tear.
It's important to choose a type that is compatible with your particular type of resin so you can get optimal results. For instance, applying silicone-based lubricant works better for epoxy resins than mineral oil which would be more suitable for polyester resins instead.
Let resin cure properly
Proper hardening of resin is essential for creating successful art with resin molds. To ensure this, one should always remember the recommended curing time and temperature for specific products. Improper curing can lead to multiple issues such as bubbling and imprecise results.
Fortunately, there are some techniques one can use to speed up the cure times. Placing the resin and hardener bottles into warm water can help elevate their temperatures. This will help to increase the catalyzing process significantly.
Additionally, allowing heat/warm air to pass through the mold during curing ensures that bubbles won’t form once it sets. This enables artists to achieve better precision from their pieces without any imperfections.
Practice safety measures
When using resin molds, proper safety measures must be taken to avoid inhaling toxic fumes and coming into direct contact with resin and hardeners. It is essential to ensure adequate ventilation in the workspace to keep air quality safe for breathing.
Wearing protective clothing such as coveralls, gloves, long-sleeved shirts, pants are also important when working with epoxy resin. Also make sure to label all items used for projects involving epoxy so that there is no risk of contamination.
A respirator should also be worn during work sessions involving different types of resins like polyester or vinyl ester resins. They produce more hazardous vapors than epoxy at low temperatures curing conditions.
Frequently Asked Questions (FAQs)
How long do you leave resin molds?
Depending on the type of resin you are using, it takes between 12-72 hours to cure but in some cases this can take as long as 28 days. Resin molds need to be left for up to 7 days for their proper curing process.
It's important to follow instructions from the specific brand and wait at least 24 hours before removing them from the mold so that they harden properly. Patience is key when leaving your resin molds and pushing or speeding up the cure process could lead to cracks or an inferior result.
Do you need to spray resin molds?
Using spray on mold release agents can be beneficial when working with resin molds. They help ensure easy removal of cured resin from molds and prevent damage during demolding. Mold release agents reduce the chances for sticking, making it easier to remove the finished product once poured into a mold.
Not all resin molds require the use of mold release agents. However, certain specific ones may need spraying according to the instructions provided. It is important to always follow safety measures and ventilation protocols indicated in the instructions while using these products.
Additionally, proper application techniques must be employed to get maximum results out of your projects with minimum wastage. Learning how to correctly apply mold releases will allow beginners a hassle free start into crafting beautiful items out of materials like epoxy resins!
How do you get resin out of mold?
Removing resin from molds can be tricky, but the good news is that with a few techniques and some practice it can be done safely and effectively. The best approach for removing resin from a mold is to let the material cure overnight or according to your specific product instructions before attempting to demold it.
A flat tool such as a credit card or palette knife can then be used for prying; slowly working in between the edge of the mold and curing resin project. For smaller intricate pieces, tweezers may be helpful when gently pushing them out of their molds.
It's important to use caution not to apply too much force which could compromise the integrity of your project! To minimize sticking issues consider spraying both sides of your silicone mold with release spray before casting.
Conclusion
Resin molds are an accessible way for beginners to explore the ever-growing field of epoxy resin crafts. Though it may seem daunting at first, with practice comes precision and ability to make beautiful pieces.
Whether you’re looking to create jewelry, wall art, coasters or furniture – there is a seemingly endless world of possibility when it comes to creating intricate works of art using your own hands! When working with resin molds be sure to clean them before use, mix and pour the material correctly, remove bubbles as instructed and carefully demold your final creation.
Leave a comment