
How To Make Silicone Molds For Resin
Looking to create amazing resin crafts at home, but are unsure of how to make silicone molds for them? Silicone molds can be used in various resin projects to add a professional touch and get creative with your designs.
This guide will provide detailed instructions on how to make silicone molds for resin, specifically for DIY enthusiasts and professional artists.
With the right products, some patience, and this ultimate step-by-step guide, making your own silicone molds is easier than ever before! Dive into our blog post now and learn the techniques behind creating one-of-a-kind designs with custom homemade silicone molding!
Supplies Needed
Here are some essential supplies you’ll need for making silicone molds:
Catalyzing solution
A catalyzing solution can be made using dish soap in water. It serves both as a mold release and helps create a tighter bond between the object and silicone when creating the mold.
The combination of soap and warm water acts as an agent that bonds with the silicone molecules. This helps create a tight seal while also preventing any air bubbles from forming during curing. When mixed correctly, this catalyzing bath will ensure an even surface on your finished product with no gaps or lines.
Silicone
Silicone is perfect for making molds as it is known to be both durable and flexible. It can be used to make molds that are perfect for any art project involving resin. This includes jewelry, sculptures, miniaturized figurines, and more. Additionally, silicone molds offer excellent detail when transferring objects into their desired shapes. Most importantly, silicone molds are easy to find and use for all types of artists regardless of skill level.
Dish soap
Dish soap has the ability to remove mold release agents and oils that can interfere with the curing process.
Using a few drops of dish soap into your catalyzing solution before mixing it with silicone will allow you to create strong custom molds that won't stick together after pouring resin.
It is also essential when preparing surfaces before coating them in silicone. This is because oil-based particles remaining on objects can act as barriers. It reduces adhesion between the object and mold material and affects the clarity or sharpness of any detailed shapes casted.
Parchment paper
Parchment paper has the perfect consistency and works as a non-stick agent when placed between the object and the mold . This means that it’s much easier to peel off after casting, avoiding any mess or difficulty. Additionally, parchment paper prevents your resin from soaking through during curing.
It also helps the silicone grip onto intricate designs more efficiently. This results in better detail captured by your mold! It plays an integral part of making successful molds so always make sure to have some on hand while crafting with resin!
Step-by-Step Guide to Making a Silicone Mold for Resin
With the proper supplies and a few easy steps, you'll be easily making high-quality silicone molds for resin in no time!
Preparing the catalyst solution
The first step in the mold-making process is preparing the catalyzing solution. It serves as an essential component that helps activate and harden your silicone mixture.
To prepare the solution, mix together a small portion of silicone with dish soap within a jar to create a thin paste-like solution.
This “catalyzing bath” will help both mix and activate the silicone when combined with another substance later on in the process. If you use too much or too little soap, this can cause issues with curing later. So be sure to follow directions when creating your catalyzing solution!
Catalyze the silicone
When making a silicone mold for resin, you will need to mix two parts of the curing solution together to achieve good results. It's important that the ratio of A side (polymer) and B side (catalyst or accelerator) is followed closely.
The suggested ratio, as recommended by manufacturers, is generally 1 part A side to 1 part B side. However, faster curing ratios can be achieved with mixes like 2 parts A and one part B.
Once both components are measured correctly it's time to mix them thoroughly. Be gentle while mixing the silicone and make sure everything is fully incorporated and no lumps remain.
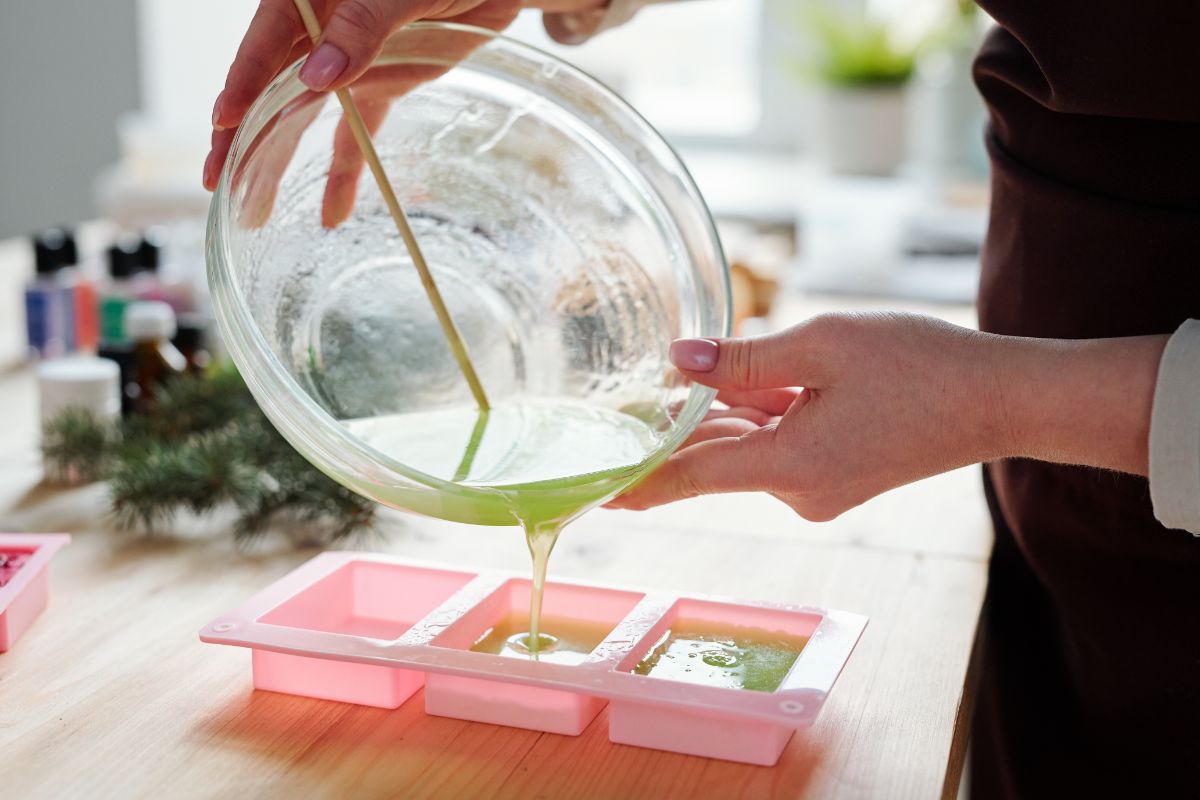
Coating the Object
Coating the object before making a silicone mold creates a barrier between the original object and the silicone. This helps to improve its adherence to that item. The right coating can also help your mold easily release from the source piece when baked or cured correctly.
It is important to choose wisely and select materials that are non-toxic, safe to use with resin, heat resistance, and impermeable. Parchment paper is often used by many DIY enthusiasts due to its lightweight nature. It prevents heavy objects from affecting even coverage while you pour in your catalyzing solution mixture.
This technique has been proven successful in making molds for small items like jewelry pieces. When working on larger objects such as replicas of wooden furniture, a multi-layered approach may be necessary.
Curing and Demolding
The curing stage varies depending on your silicone type, typically taking from several hours to a day. During this process, make sure your environment is dust-free with stable room temperature and humidity. We also recommend you to regularly check the mold to confirm it's fully cured; rushing this step may damage your mold.
When demolding, carefully separate the mold from the master model, using techniques like flexing for ease. Clean the mold thoroughly after demolding. If you encounter uneven curing or stickiness, apply specific corrective measures. Store and maintain your molds properly to extend their lifespan. Remember, safety and patience are crucial when working with silicone molds.
Tips and Recommendations for Making Silicone Molds

When making silicone molds, always use proper safety precautions and use a release agent to prevent sticking. Here are some tips that'll help you during the process:
Use proper safety precautions
It is essential that artists adhere to safety precautions when working with epoxy resin and mold making. Wear gloves, masks, and other protective gear to help guard against skin contact irritation or breathing in fumes.
Epoxy can be volatile and we recommend you to always work in a well-ventilated area with good airflow. Read through product labels for any warnings before beginning your silicone mold project. Also, pay extra attention to notes on air quality levels and contact warnings related to respiratory irritants.
Abrasive materials such as steel wool or toothbrushes should not come into contact with silicone molds. This could cause tearing or scratched surfaces which can ruin the entire casting process.
Experiment with different objects to mold
Experimenting with different objects will allow you to explore various shapes, textures, and sizes to create unique and personalized resin pieces.
When selecting an object, it is important to consider its material as well as detailed surface features. This will determine the outcome of particular effects on the finished product.
Furthermore, you can experiment with other ingredients like cornstarch to make two-ingredient molds. With these combinations available at your disposal, you'll be able to augment your work by producing items rarely seen before!
Consider using a release agent
A release agent prevents the mold material from sticking to both the item being cast and the container. A few examples of popular release agents include petroleum jelly, mineral oil, cooking spray, vegetable oils, and waxes.
It’s up to you which specific release agent you prefer but it must be used according to size, detail and material compatibility of your project. Not applying a release agent can lead to difficult-to-demolding projects that may stretch or tear which will result in damaged pieces or casts with poor exterior surfaces.
Frequently Asked Questions (FAQs)
Does resin stick to silicone molds?
No, resin does not stick to silicone molds. Silicone is known for its non-stick properties, which makes it perfect for resin casting. When the resin hardens, it can be easily removed from a silicone mold without sticking which helps maintain the shape and detail of the resin piece.
How do you make molds at home without silicone?
To make molds at home without silicone, use everyday items like plastic containers for simple shapes, or create custom molds with laminated paper. Hot glue guns can also shape molds on smooth surfaces, while non-hardening clay is suitable for more intricate designs. For a sturdier option, Plaster of Paris can be shaped into molds. These alternatives are budget-friendly ways to make molds but they may not offer the same level of detail and durability as silicone molds.
Is silicone safe for resin?
Yes, silicone is safe for resin because it's heat-resistant, flexible, and doesn't react. This means it won't cause any chemical changes, ensuring that your finished product maintains its intended appearance. Silicone molds can also be reused multiple times, making them a durable and safe option for resin projects.
How to make resin molds?
To make resin molds, gather supplies like silicone mold rubber and a mold box. Mix the silicone according to instructions, then pour it over your object in the mold box. Allow it to cure. Once set, remove the object and pour resin into the mold. After curing, demold to reveal your custom resin creation.
Conclusion
Silicone molds let creatives explore resin craftsmanship in many different ways. From small pendants and earrings, to larger-scale sculptures and models, they provide an economical way for artists to cast resin and achieve professional results.
This article explored the many advantages that working with silicone molds brings. We've also outlined step-by-step instructions on how you can create your own silicone mold at home.
No matter what kind of project you’re interested in trying out, using silicone molding is likely a great option which will open up new creative possibilities!
Leave a comment